Here is the jig I came up with for making wedge-shaped boards for shells. I have been making the wedges for a few decades with different methods, but this jig described below I believe is the most accurate way to make them. Recently I read an article in the December 2020 issue of American Woodturner about the "BB Stave System". It used a slightly different approach involving a thickness planer to make the wedges. I'm sure there's several different ways to make the wedges, but I like to rip a board into two rough wedges with a band saw, and then true up both faces with my router jig as described below.

The wedge planing jig is simply a stiff and very flat board that's propped up by a pair of triangles near the ends. The angle of the wedge will be equal to the angle of the triangles. The wedge blanks are held on the jig with a vacuum chuck. The jig moves over a router table with a surfacing bit extending above the surface of the table. In the photo a pair of carriage bolts act as handles to move the jig. Here is a PDF file of the patterns for 15° triangles. These precision patterns should be printed on a shipping label, then stuck on good quality plywood and cut oversized and sanded to the line with a benchtop disc sander. Alternatively they can be table saw cut with my Precision Polygon Jig.
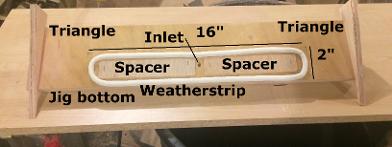
The bottom of the jig has a gasket made of weather-strip tape. Inside the gasket there is a thin spacer to limit the compression of the gasket under vacuum pressure. The spacer is approximately 1/3 the thickness of the gasket. Also inside the gasket is an air passage hole for connection to a 1/4" I.D. vinyl tube to a vacuum pump and filter. The larger the gasket area, the stronger the hold - and the larger the wedge needs to be to cover the gasket.

The weather-strip tape is available in different shapes. I use the hollow "D" shape, it forms a good vacuum seal and is less likely to warp the thin edge under pressure. To join the ends with the least amount of leakage, overlap the ends of the weather-strip and slice through it with a sharp knife. Remove the cutoff from underneath, and butt the ends together.

The router table is simply a medium sized router mounted upside down on a flat stiff shelf board. The table should be at least twice as long as the distance between the triangle so the ends of the wedge can reach the cutter without the other end of the jig falling off the table. I use a 3-wing 1" diameter surfacing bit with 1/4" shank to use as my planing bit. I used a marker to make marks to use as a guide during planing to ensure that the cuts overlap. The router bit is available here. It's also a good idea to rig up dust collection. I use a large trashcan to support the router table, and have a 4" dust collector hose to remove at least some of the shavings.

The triangles need a somewhat loose fitting shallow groove to keep them square to the jig. Drill a hole through the center of the groove for the screw that holds each triangle. Slide a triangle into the groove so that it raises the bottom front edge about 5/8" over the router table. Drill a pilot hole into the triangle through the hole in the jig, and then secure the triangle with a screw. Repeat this on the other end raising the end so the bottom front edge is parallel to the router table. It is very important that the main board of the jig is flat, and that the grooves are uniform depth so the jig sits flat on both triangle bases at the same time.
Watch the video below to see how the wedge is positioned onto the jig and planed to perfection. I have devised another way to mill the wedges with a table saw, but this jig is so much simpler to make and eliminates the possibility of having a small step where the two cuts meet when using the table saw method. The portion of the video showing this jig begins at 5:10.